

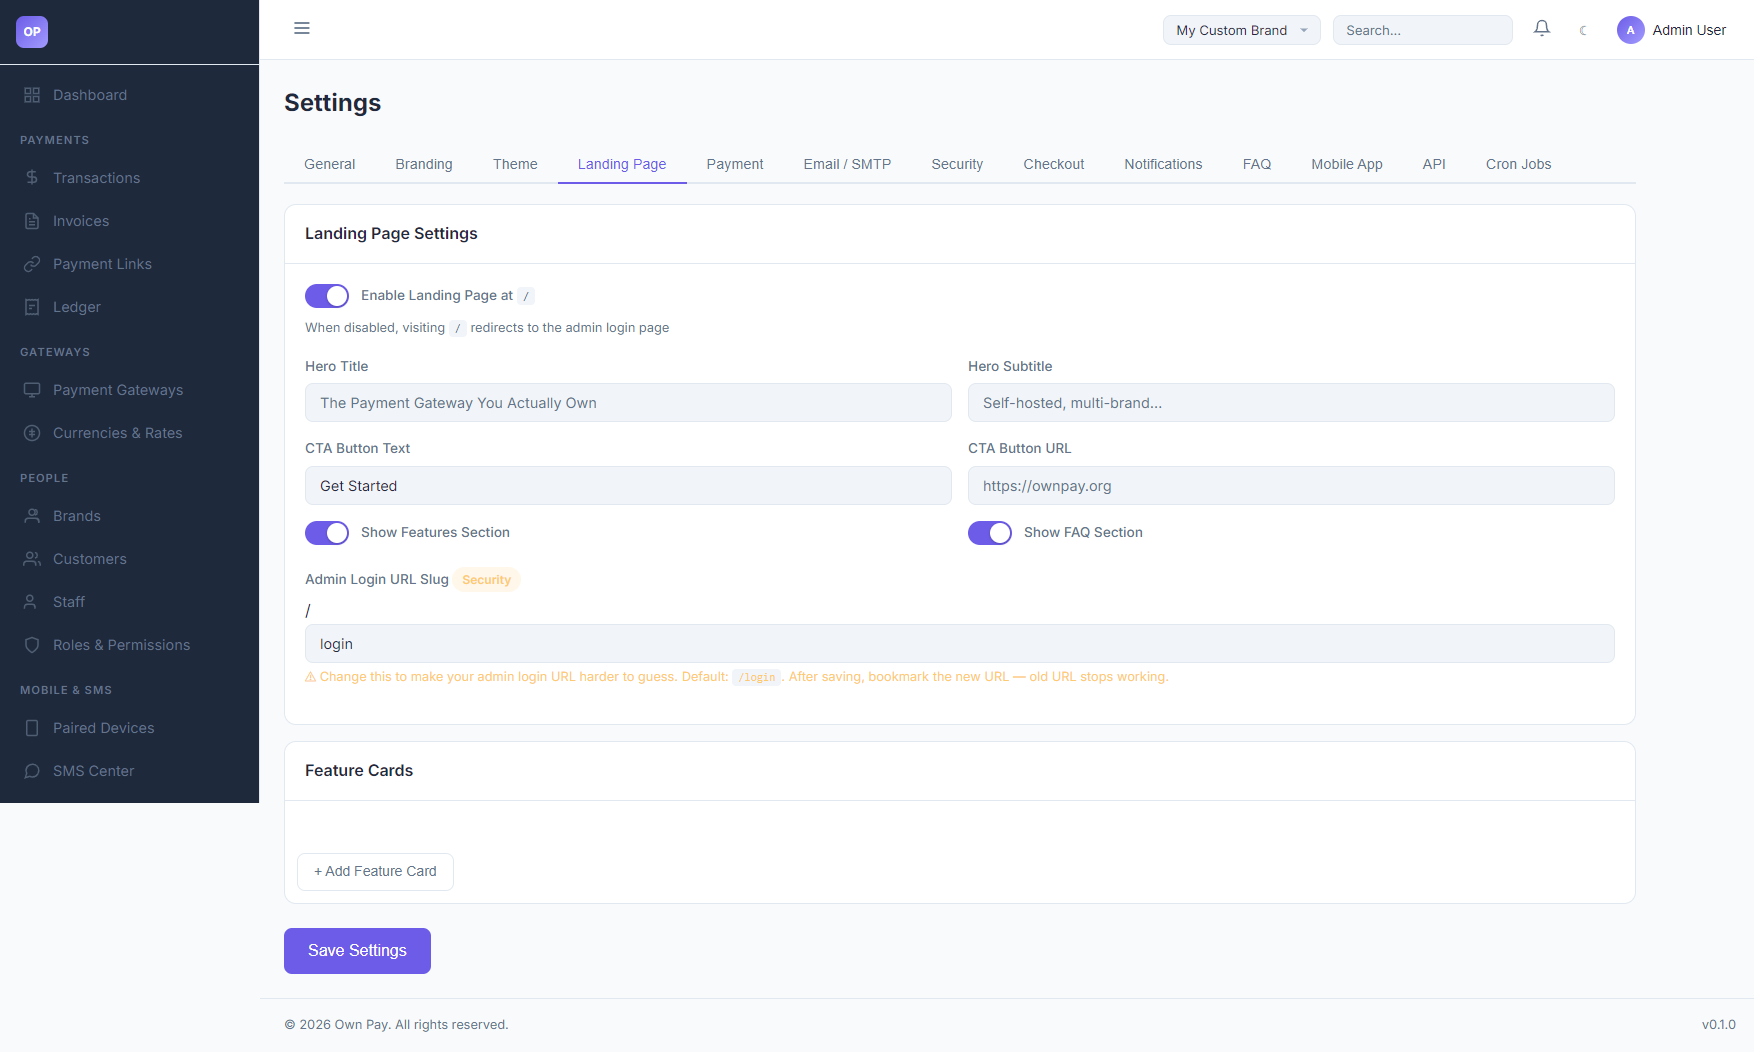
Landing Page Settings
Purpose: Configure public home screen components, hero CTA buttons, feature cards, and modify the secure admin login path.
Overview
The Landing Page settings tab manages the visibility and content of your platform's public-facing landing page (the root / URL), and contains critical security controls like the Admin Login URL Slug to hide your administrative login entrance.
Getting Here
To access the Landing Page Settings:
- Log in to the OwnPay admin dashboard as the super-administrator.
- Under the SYSTEM section in the left sidebar, click Settings.
- Under the Settings header tabs, click Landing Page.
Page Sections
The Landing Page settings dashboard is divided into three key panels:
1. General Page Settings
- Enable Landing Page: Toggle whether visiting the root URL
/displays the marketing landing page. When disabled, visiting/redirects users directly to the admin login view.
2. Marketing Content
- Hero Title / Subtitle: Large banner text shown at the top of the landing page.
- CTA Button Text / URL: Call-to-action button settings (e.g. "Get Started" pointing to registration or docs).
- Show Features / FAQ Sections: Toggles to enable or hide modular content sections.
- Feature Cards Builder: Click + Add Feature Card to append custom feature details (title, description, icon) to the landing page layout.
3. Security Credentials
- Admin Login URL Slug: Allows you to change the URL path used to access the admin portal (default is
login, e.g.https://ownpay.test/login).
Fields & Options Reference
Landing Page Fields Reference
| Field Name | Type | Default | Description |
|---|---|---|---|
| Enable Landing Page | Toggle | Enabled | Set public root view behavior. |
| Hero Title | Text Input | The Payment Gateway... | Big marketing headline. |
| Hero Subtitle | Text Input | Self-hosted, multi-brand... | Explanatory tagline. |
| CTA Button Text | Text Input | Get Started | Call-to-action label. |
| CTA Button URL | Text Input | https://ownpay.org | Redirect target for the CTA button. |
| Login URL Slug | Text Input | login | Secure path used to enter the admin panel (e.g. /secret-login). |
Step-by-Step: How to Use This Page
Masking the Admin Login URL
- Navigate to the Landing Page settings tab.
- Scroll to the Admin Login URL Slug input box.
- Replace
loginwith a secure, hard-to-guess slug (e.g.op-admin-portal-2026). - Click Save Settings in the footer.
- ⚠️ MUST DO: Immediately bookmark the new URL (
https://yourdomain.com/op-admin-portal-2026). The default/loginroute will now return a 404 Not Found page to mask the admin interface.
Adding a Feature Card
- Under Feature Cards, click + Add Feature Card.
- Enter a title (e.g., "SMS Auto-Verification") and description.
- Select an icon class or label.
- Click Save Settings to publish the section.
Best Practices
- ✅ Do: Change the Admin Login URL Slug in production to prevent automated bots from finding your login portal.
- ✅ Do: Keep the Landing Page enabled if you intend to distribute public payment links, as it provides a professional home page layout.
- ❌ Don't: Forget your custom login slug. If lost, you will need to manually inspect the
op_system_settingsdatabase table to retrieve it.
Must Do
⚠️ The Admin Login URL Slug must only contain lowercase letters, numbers, and hyphens. Spaces, capitals, or special characters (like
@or+) are blocked by route parameter constraint filters and will crash the router.
Related Pages
- Branding Settings — Customize SEO titles and company logos.
- System Settings — Manage timezones and base URL parameters.
- Domains — Setup custom white-label hostnames.